AE86 Quaife QSR & Manual steering swap info.
Posted: Fri Feb 04, 2011 7:32 pm
Alright, here's another one of my old(er) tech threads, along with some fresh(er) info at the bottom of the page.
~~~~~~~~~~~~~~~~~~~~~~~~~~~~~~~~~~~~~~~~~~~~~~~~~~~~~~
Quaife QSR - Installation & manual steering info:
----------------------------------------------------------------------
AE86 Corolla manual steering rack assembly.
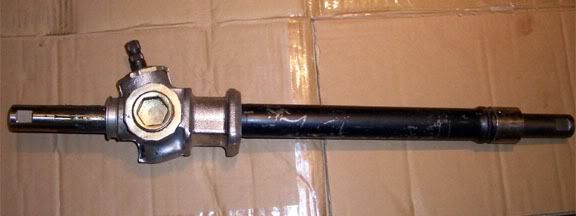
Dissassembling a manual rack.
Note: LARGE 24" crescent wrench necessary (lock/retaining nut is 48mm/2" in)
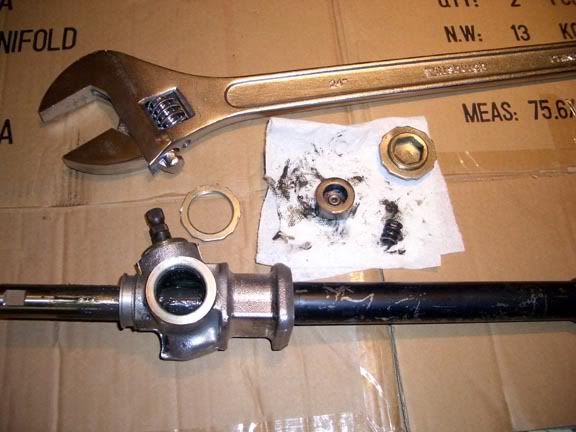
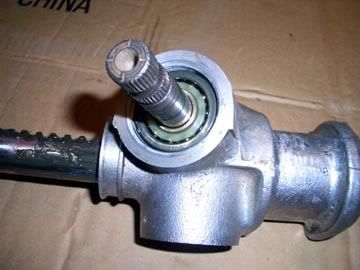
When dissassembling just take it apart and keep everything in order, you don't need to remove the bottom bearing for the pinion gear unless you're replacing it.
Dissassembly:
1. Remove 2 locking nuts (#1 & 2)
2. Remove rack guide cap nut, tension spring, rack guide. (#2)
3. Remove pinion cap nut, pinion gear & top bearing. (#1 & 4)
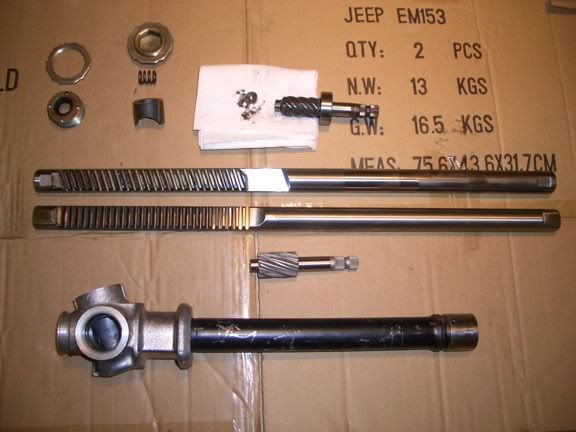
4. Slide rack gear out of housing - ONLY take it out the drivers side, as pulling it out the passenger will 'score' the pass side end bushing/guide. (#3)
Be sure to clean out as much of the old grease as you can (I used several 3/8" extensions and a couple paper towels to clean out the inside of the rack) Also, make sure the 4 holes just before the end of of the rack housing on the passenger side are clear otherwise you may blow the steering rack boots up or suck them into the gears as it equalizes pressure from one side to the other when moving back and forth.
Dissassembled manual rack: top rack & pinion gear set is toyota factory, bottom rack and pinion is a Quaife Quick-Steering Rack gear kit. The one pictured is a modified Quaife QSR kit with 2 extra teeth cut for additional angle with a Battle Version #2 steering angle kit (if needed).
Manual rack pinion bearing removal
Note: installation is flipping gear opposite way to pull bearing down pinion gear shaft.
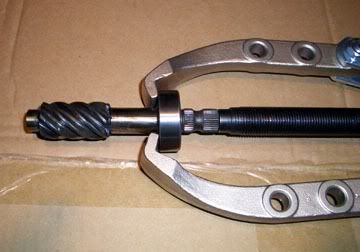
NOTE: Use molybdenium lithium based grease for reassembly - it came in a black 'peanut' size can from reibes/napa - kragen/shucks/checkers didn't carry it locally.
Apply grease before assembling to:
Rack gear teeth and lightly coat the back side of the gear tooth area.
Pinion bearings & gear (can be packed into pinion gear area, just dont want to fill the whole rack with grease)
Rack guide & spring as rack gear glides along/against it.
Reassembly.
1. Install rack gear, slide in from drivers side.
2. Install Pinion gear, top bearing and cap/tension nut.
When installing spin down pinion nut cap finger tight, then take a small screwdriver and by hand give a small tug to lightly 'snug' down the pinion gear and bearings - no more pressure than that is necessary, or wanted! It is supposed to be set with a inch lb torque wrench for preload but I've found that finger tight with a tiny snug sets it just as well as it was set from the factory (ie: enough to hold steady with no wobble but light enough it spins freely).
3. Install rack guide, spring and cap/tension nut.
I puchased a 3/4" (?) size bolt and 2 nuts from home cheapo that fit into the cap correctly so I could tighten down the cap/tension nut with ease. Snug down by hand & wrench until the rack gear/shaft has no lateral (forward/back & up/down) play, but moves left and right with no catching and/or binding.
4. Install locking nuts.
----------------------------------------------------------------------
For reference:
AE86 Corolla Manual steering intermediate shaft vs p/s intermediate shaft
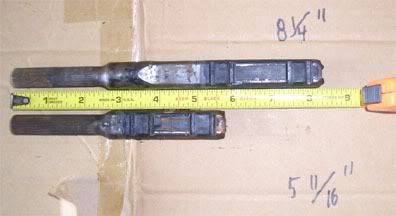
AE86 Corolla Manual rack intermediate steering shaft installed
Note: due to low height of manual rack, the steering shaft was 'pulled' out farther than shown in picture.
If you do not have the manual rack intermediate steering shaft, you can take two p/s column's, cut the end off of one column at about 3.75" (3 3/4)" and weld it to the second for the extended reach.
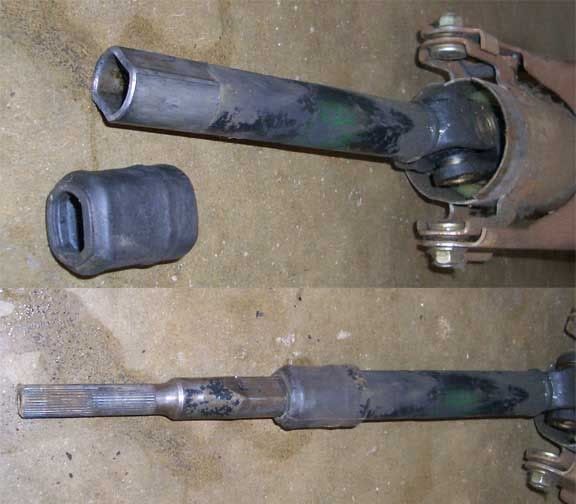
AE86 Corolla Manual vs PS rack pinion shaft size
As can be seen in the picture, the p/s and manual rack pinion shafts are different sizes. Which means you cannot use the u-joint for the p/s on the manual rack or vice versa.
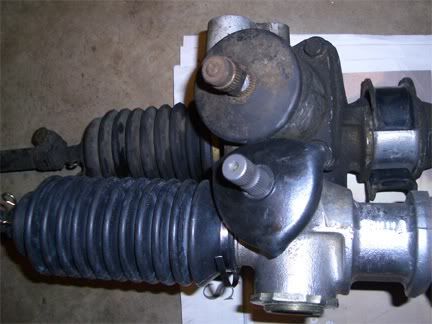
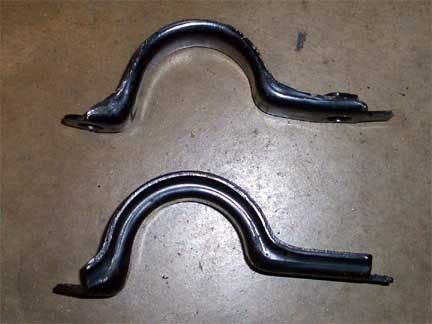
AE86 Corolla Manual (top) vs P/S (bottom) driver side brackets
I decided to go with the P/S bracket (bottom) as it is much stronger.
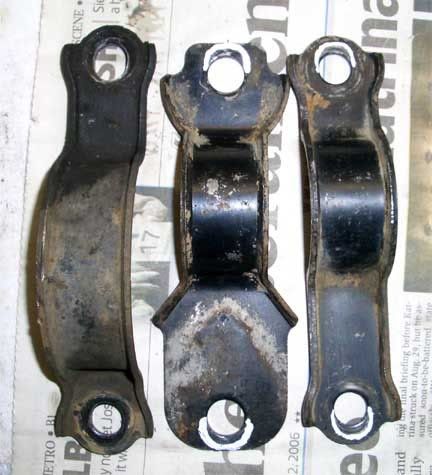
AE86 Corolla Manual Rack (center & right) vs P/S (left) pass side brackets
Note: the markings are around the areas that needed to be ground/widened to fit correctly on my originally P/S equipped vehicle. (may vary from vehicle to vehicle - not sure if it'll be necessary on anyone elses)
----------------------------------------------------------------------
Misc.
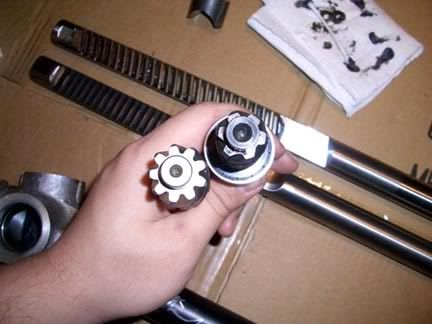
AE86 Corolla manual steering factory pinion gear vs. quaife qsr pinion gear (quaife left/lower, factory right/upper)
AE86 Corolla Manual vs P/S Rack
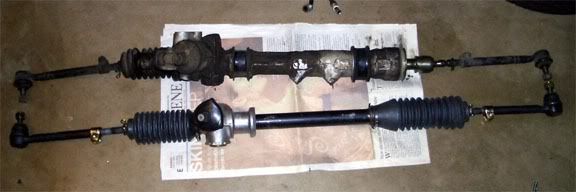
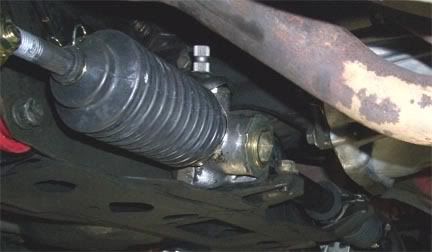
AE86 Corolla Manual rack installed.
----------------------------------------------------------------------
Link to a video of steering angle (provided by nimdivo)
http://home.comcast.net/~nimdivino/quaifeqsr.wmv
UPDATE: after spraying my inner fender area with some undercoat, to cover the area I hammered back to clear tires with ncrca's & 2.5 degrees caster I notice I AM rubbing on the inner unibody frame rail on both sides at full-lock with the p/s knuckles.
So, in other words. If you run p/s knuckles you won't need a BV kit or aftermarket (ueo/jic/etc) tie rod ends, as it wont help you get more angle. Or atleast without some super wide offset rims, or really far out there adj. control arms/ncrca's
UPDATE 2: just an FYI, aw11 rack housings are the same as the ae86, the only difference is the aw11 rack 'pinion' gear shaft is 1 inch longer and doesn't need the column extended as far as the ae86 rack & pinion gear. (NOTE: if you swap the quaife qsr into the aw11 rack it would be the exact same as an ae86 rack equiped with a QSR)
UPDATE 3: From my posts regarding manual rack/qsr on club4ag regarding column extension/adapters
--------------------------------------------------------------------------------
I just took a quick measurement, there's an extra 1 1/4" of shaft that should be inside the column extension.
Some quick math on the differences in ae86 manual rack column & intermediate shaft differences = 3.825" extension would be perfect. (just a hair under 3 53/64" which is the combined difference between the total lengths of the manual & p/s column and shafts.)
So if you were going to weld to the column/make and adapter: I'd just round it down to 3.75 - 3 3/4" for the extension if installing a quaife qsr/oem ae86 manual rack
Subtract 1" if using an aw11 manual rack.
--------------------------------------------------------------------------------
~~~~~~~~~~~~~~~~~~~~~~~~~~~~~~~~~~~~~~~~~~~~~~~~~~~~~~
UPDATE 11/15/07:
Parts necessary to convert to manual steering on an AE86; multiple choices/ways.
1. Steering rack.
A.) AE86 manual rack
B.) AW11 manual rack
Note: both will need to use AE86 inner & outer tie rod ends. The AW11 inner tie rods are too long, and the outers won't fit.
2. U-joint/Rag-joint between manual rack & steering column/intermediate shaft.
A.) AE86 manual rack u-joint
B.) AW11 manual rack u-joint
3. Passenger side brackets or adapters.
A.) AE86 OEM manual rack brackets with OEM/Poly manual rack bushings.
B.) Homemade manual rack brackets with OEM/Poly manual rack bushings.
C.) T3 Manual rack conversion bushings, utilizing the power steering rack brackets.
Tip: the power steering drivers side bracket is stronger than the manual steering version, so I recommend using the drivers side power bracket.
4. Intermediate shaft or steering column extension.
A.) AE86 manual steering column & intermediate shaft.
B.) AE86 power steering column, weld on column extension. So that the intermediate shaft is able to reach the steering rack to connect them with the U-joint.
(Approx 3.5" length extension if using an AE86 manual rack, 2.5" for AW11 manual racks.
NOTE: This is going off of measurements on the AE86 rack, and 3rd party information on the AW11 rack. AS I have been told the steering rack splined shaft is 1" longer on the AW11 manual rack, than the AE86 rack.
IF you're going to weld an extension on, be SURE to take measurements and verify it for yourself!!!)
C.) AE86 power steering column & MKIII/MK3 Supra Intermediate shaft.
_________________________________________________________
UPDATE 11-18-07
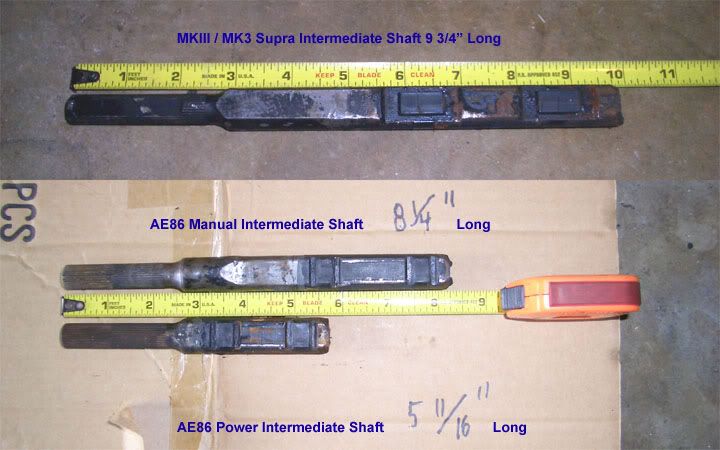
Just to confirm it, I went to the junkyard today and pulled an MKIII/MK3 Supra intermediate shaft. It will work VERY well for an AE86 manual steering swap. Matter a fact, I'm going to change it out with my AE86 one as it will give me a stronger setup.
The reason being using an AE86 manual intermediate shaft with the power column leaves you with only 1/2-1" of insertion into the column... with the MKIII Supra one I'll have 2-2.5". Making it a much stronger connection.
___________________________________________________________
Update 11/18/08
What I 'believe' are the known versions of the QSR and the differences.
Version 1: Rack gear bottomed out on pinion gear before tie rods hit due to not enough teeth cut into rack gear.
(The reason Taka Aono didn't use it on his auto-x 86 - IIRC)
Version 2: Correct length for stock replacement, IE: inner tie rods bottomed out against the rack like stock. Good for racing/autox/grip but not still did not have enough teeth cut for additional angle spacers/tie rods for the drift crowd.
Version 3: Ability to use spacers/aftermarket tie rods. Has the extra teeth necessary.
(And then there is also a prototype/modifed version 2 with extra extra teeth, I might be the only one with it according to Long/xXRidgeRacerXx who was the original person to make the effort to get Version 2 & 3)
___________________________________________________________
Anyone got any other suggestions, tips or answers?
Andrew
~~~~~~~~~~~~~~~~~~~~~~~~~~~~~~~~~~~~~~~~~~~~~~~~~~~~~~
Quaife QSR - Installation & manual steering info:
----------------------------------------------------------------------
AE86 Corolla manual steering rack assembly.

Dissassembling a manual rack.
Note: LARGE 24" crescent wrench necessary (lock/retaining nut is 48mm/2" in)


When dissassembling just take it apart and keep everything in order, you don't need to remove the bottom bearing for the pinion gear unless you're replacing it.
Dissassembly:
1. Remove 2 locking nuts (#1 & 2)
2. Remove rack guide cap nut, tension spring, rack guide. (#2)
3. Remove pinion cap nut, pinion gear & top bearing. (#1 & 4)
4. Slide rack gear out of housing - ONLY take it out the drivers side, as pulling it out the passenger will 'score' the pass side end bushing/guide. (#3)
Be sure to clean out as much of the old grease as you can (I used several 3/8" extensions and a couple paper towels to clean out the inside of the rack) Also, make sure the 4 holes just before the end of of the rack housing on the passenger side are clear otherwise you may blow the steering rack boots up or suck them into the gears as it equalizes pressure from one side to the other when moving back and forth.
Dissassembled manual rack: top rack & pinion gear set is toyota factory, bottom rack and pinion is a Quaife Quick-Steering Rack gear kit. The one pictured is a modified Quaife QSR kit with 2 extra teeth cut for additional angle with a Battle Version #2 steering angle kit (if needed).

Manual rack pinion bearing removal
Note: installation is flipping gear opposite way to pull bearing down pinion gear shaft.

NOTE: Use molybdenium lithium based grease for reassembly - it came in a black 'peanut' size can from reibes/napa - kragen/shucks/checkers didn't carry it locally.
Apply grease before assembling to:
Rack gear teeth and lightly coat the back side of the gear tooth area.
Pinion bearings & gear (can be packed into pinion gear area, just dont want to fill the whole rack with grease)
Rack guide & spring as rack gear glides along/against it.
Reassembly.
1. Install rack gear, slide in from drivers side.
2. Install Pinion gear, top bearing and cap/tension nut.
When installing spin down pinion nut cap finger tight, then take a small screwdriver and by hand give a small tug to lightly 'snug' down the pinion gear and bearings - no more pressure than that is necessary, or wanted! It is supposed to be set with a inch lb torque wrench for preload but I've found that finger tight with a tiny snug sets it just as well as it was set from the factory (ie: enough to hold steady with no wobble but light enough it spins freely).
3. Install rack guide, spring and cap/tension nut.
I puchased a 3/4" (?) size bolt and 2 nuts from home cheapo that fit into the cap correctly so I could tighten down the cap/tension nut with ease. Snug down by hand & wrench until the rack gear/shaft has no lateral (forward/back & up/down) play, but moves left and right with no catching and/or binding.
4. Install locking nuts.
----------------------------------------------------------------------
For reference:
AE86 Corolla Manual steering intermediate shaft vs p/s intermediate shaft

AE86 Corolla Manual rack intermediate steering shaft installed
Note: due to low height of manual rack, the steering shaft was 'pulled' out farther than shown in picture.
If you do not have the manual rack intermediate steering shaft, you can take two p/s column's, cut the end off of one column at about 3.75" (3 3/4)" and weld it to the second for the extended reach.

AE86 Corolla Manual vs PS rack pinion shaft size
As can be seen in the picture, the p/s and manual rack pinion shafts are different sizes. Which means you cannot use the u-joint for the p/s on the manual rack or vice versa.

AE86 Corolla Manual (top) vs P/S (bottom) driver side brackets
I decided to go with the P/S bracket (bottom) as it is much stronger.

AE86 Corolla Manual Rack (center & right) vs P/S (left) pass side brackets
Note: the markings are around the areas that needed to be ground/widened to fit correctly on my originally P/S equipped vehicle. (may vary from vehicle to vehicle - not sure if it'll be necessary on anyone elses)

----------------------------------------------------------------------
Misc.
AE86 Corolla manual steering factory pinion gear vs. quaife qsr pinion gear (quaife left/lower, factory right/upper)

AE86 Corolla Manual vs P/S Rack

AE86 Corolla Manual rack installed.

----------------------------------------------------------------------
Link to a video of steering angle (provided by nimdivo)
http://home.comcast.net/~nimdivino/quaifeqsr.wmv
UPDATE: after spraying my inner fender area with some undercoat, to cover the area I hammered back to clear tires with ncrca's & 2.5 degrees caster I notice I AM rubbing on the inner unibody frame rail on both sides at full-lock with the p/s knuckles.
So, in other words. If you run p/s knuckles you won't need a BV kit or aftermarket (ueo/jic/etc) tie rod ends, as it wont help you get more angle. Or atleast without some super wide offset rims, or really far out there adj. control arms/ncrca's
UPDATE 2: just an FYI, aw11 rack housings are the same as the ae86, the only difference is the aw11 rack 'pinion' gear shaft is 1 inch longer and doesn't need the column extended as far as the ae86 rack & pinion gear. (NOTE: if you swap the quaife qsr into the aw11 rack it would be the exact same as an ae86 rack equiped with a QSR)
UPDATE 3: From my posts regarding manual rack/qsr on club4ag regarding column extension/adapters
--------------------------------------------------------------------------------
I just took a quick measurement, there's an extra 1 1/4" of shaft that should be inside the column extension.
Some quick math on the differences in ae86 manual rack column & intermediate shaft differences = 3.825" extension would be perfect. (just a hair under 3 53/64" which is the combined difference between the total lengths of the manual & p/s column and shafts.)
So if you were going to weld to the column/make and adapter: I'd just round it down to 3.75 - 3 3/4" for the extension if installing a quaife qsr/oem ae86 manual rack
Subtract 1" if using an aw11 manual rack.
--------------------------------------------------------------------------------
~~~~~~~~~~~~~~~~~~~~~~~~~~~~~~~~~~~~~~~~~~~~~~~~~~~~~~
UPDATE 11/15/07:
Parts necessary to convert to manual steering on an AE86; multiple choices/ways.
1. Steering rack.
A.) AE86 manual rack
B.) AW11 manual rack
Note: both will need to use AE86 inner & outer tie rod ends. The AW11 inner tie rods are too long, and the outers won't fit.
2. U-joint/Rag-joint between manual rack & steering column/intermediate shaft.
A.) AE86 manual rack u-joint
B.) AW11 manual rack u-joint
3. Passenger side brackets or adapters.
A.) AE86 OEM manual rack brackets with OEM/Poly manual rack bushings.
B.) Homemade manual rack brackets with OEM/Poly manual rack bushings.
C.) T3 Manual rack conversion bushings, utilizing the power steering rack brackets.
Tip: the power steering drivers side bracket is stronger than the manual steering version, so I recommend using the drivers side power bracket.
4. Intermediate shaft or steering column extension.
A.) AE86 manual steering column & intermediate shaft.
B.) AE86 power steering column, weld on column extension. So that the intermediate shaft is able to reach the steering rack to connect them with the U-joint.
(Approx 3.5" length extension if using an AE86 manual rack, 2.5" for AW11 manual racks.
NOTE: This is going off of measurements on the AE86 rack, and 3rd party information on the AW11 rack. AS I have been told the steering rack splined shaft is 1" longer on the AW11 manual rack, than the AE86 rack.
IF you're going to weld an extension on, be SURE to take measurements and verify it for yourself!!!)
C.) AE86 power steering column & MKIII/MK3 Supra Intermediate shaft.
_________________________________________________________
UPDATE 11-18-07
Just to confirm it, I went to the junkyard today and pulled an MKIII/MK3 Supra intermediate shaft. It will work VERY well for an AE86 manual steering swap. Matter a fact, I'm going to change it out with my AE86 one as it will give me a stronger setup.
The reason being using an AE86 manual intermediate shaft with the power column leaves you with only 1/2-1" of insertion into the column... with the MKIII Supra one I'll have 2-2.5". Making it a much stronger connection.

___________________________________________________________
Update 11/18/08
What I 'believe' are the known versions of the QSR and the differences.
Version 1: Rack gear bottomed out on pinion gear before tie rods hit due to not enough teeth cut into rack gear.
(The reason Taka Aono didn't use it on his auto-x 86 - IIRC)
Version 2: Correct length for stock replacement, IE: inner tie rods bottomed out against the rack like stock. Good for racing/autox/grip but not still did not have enough teeth cut for additional angle spacers/tie rods for the drift crowd.
Version 3: Ability to use spacers/aftermarket tie rods. Has the extra teeth necessary.
(And then there is also a prototype/modifed version 2 with extra extra teeth, I might be the only one with it according to Long/xXRidgeRacerXx who was the original person to make the effort to get Version 2 & 3)
___________________________________________________________
Anyone got any other suggestions, tips or answers?
Andrew