PART 6-Wiring
this can be the most overwhelming part of the build, if your a DIY'er like me. many just send the 20v engine harness and the 16v engine harness off to be done by a pro, at the cost of $350-700. Im not a pro, but i have experience and its proven since my car runs, and will do it if you need me to. PM me if your interested.
you have 2 options for that route. Dr Tweak of Pheonix Tuning or mr220v.
Dr Tweak...
http://forums.club4ag.com/zero...=4780
http://forums.club4ag.com/zerothread?id=13939
mr220v...
http://forums.club4ag.com/zero...=2434
http://forums.club4ag.com/zerothread?id=13573
-----------------------------------------------------------------------------------------------------------------------
now if your thorough with your work, have good research skills, soldering skills, wire diagram knowledge, lots of free time, and a desire to do this yourself, heres a simple walk through. but be warned! its not easy, if you feel that it might be too much, dont do it, you will cause more damage, and spend more money in the long run. but lucky you, you dont have to go searching all over for the info, heres my collection of stuff that made it possible for me to do it.
You will greatly benefit from owning an FSM for your car. the Haynes manual also has the wiring diagrams too if you cant get an FSM.
FSM=Factory Service Manual
-----------------------------------------------------------------------------------------------------------------------
all the 20v pigtails can be sourced at your local junkyard. along with the MAP sensor from the 1993-97 corolla and the IAT sensor from any 90's toyota. the ECU plugs from the same corolla, other 90's toyotas and the same era hondas too. i brought parts with me, had them marked so they knew i wasnt stealing them and so i didnt pay for them again, and just matched them up. i cut about 6" off so theres something to work with.
i also suggest if your building your own, to buy a sacraficial harness, i recommend the 1993-1997 corolla, since you can use a bunch of its pigtails, the MAP sensor and the IAT sensor, along with the ecu plugs.
-----------------------------------------------------------------------------------------------------------------------
this site is a guys diary of a swap in his aw11 mr2. really good info and pics.
http://www.padandwheels.com
link to all the pigtails for the motor and what wire is what...
http://padandwheels.com/mr2/bl....html
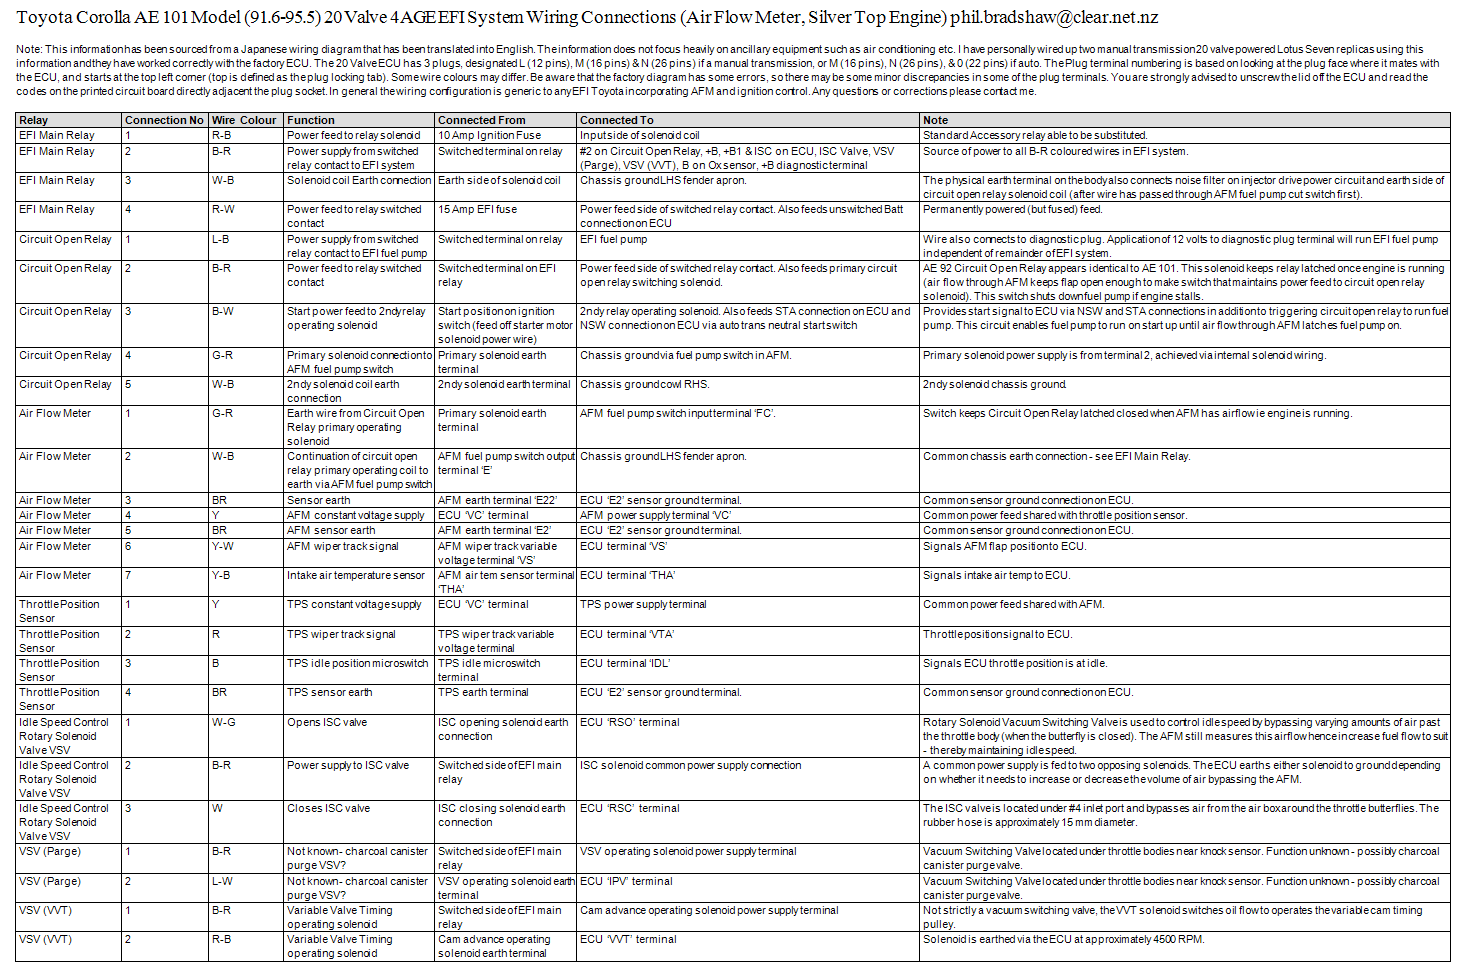
Silvertop wiring diagram. similar to the BT, but consider the difference from AFM and MAP. still good in seeing how things are done up. i printed this out huge, taped all the pages together, and put it on the wall of my garage.
http://media.photobucket.com/i...m.jpg
this is just a little diagram i found...
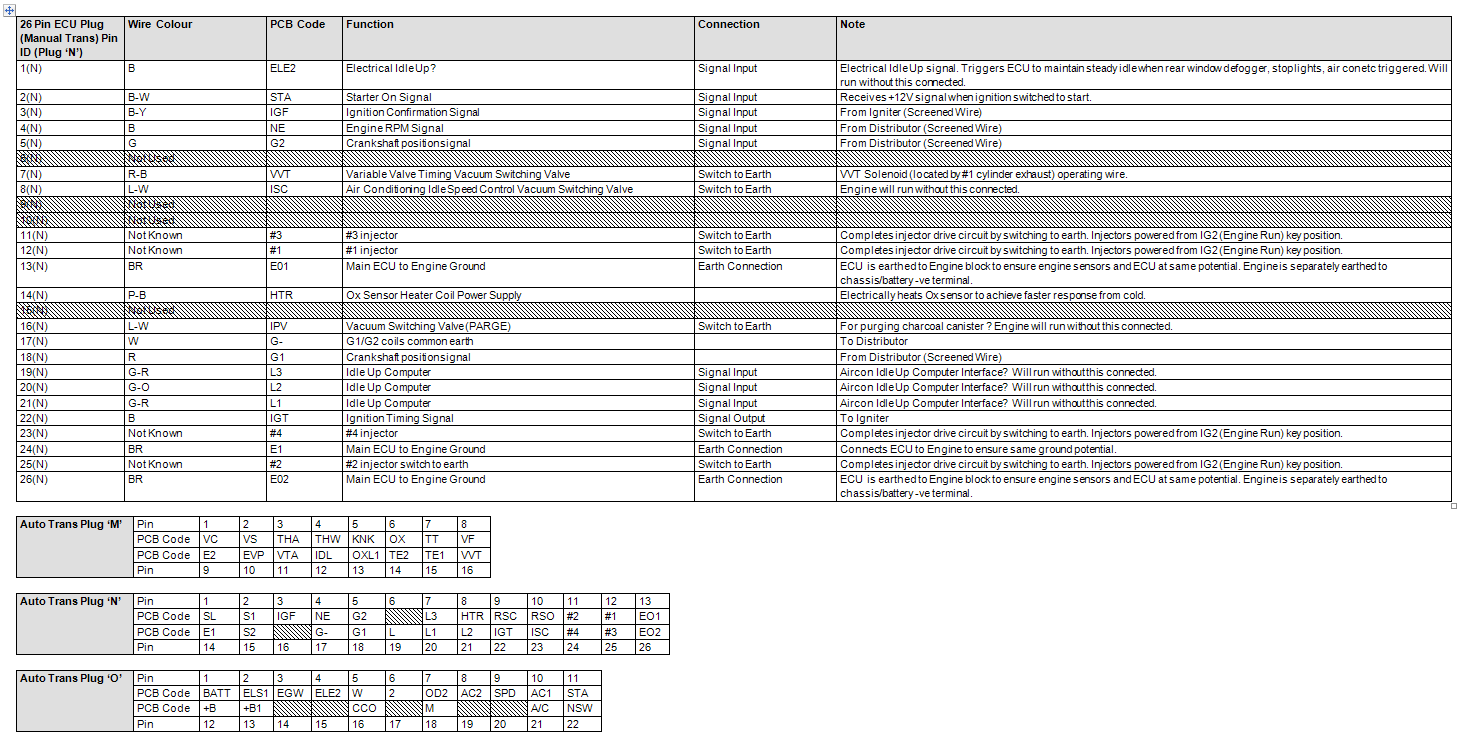
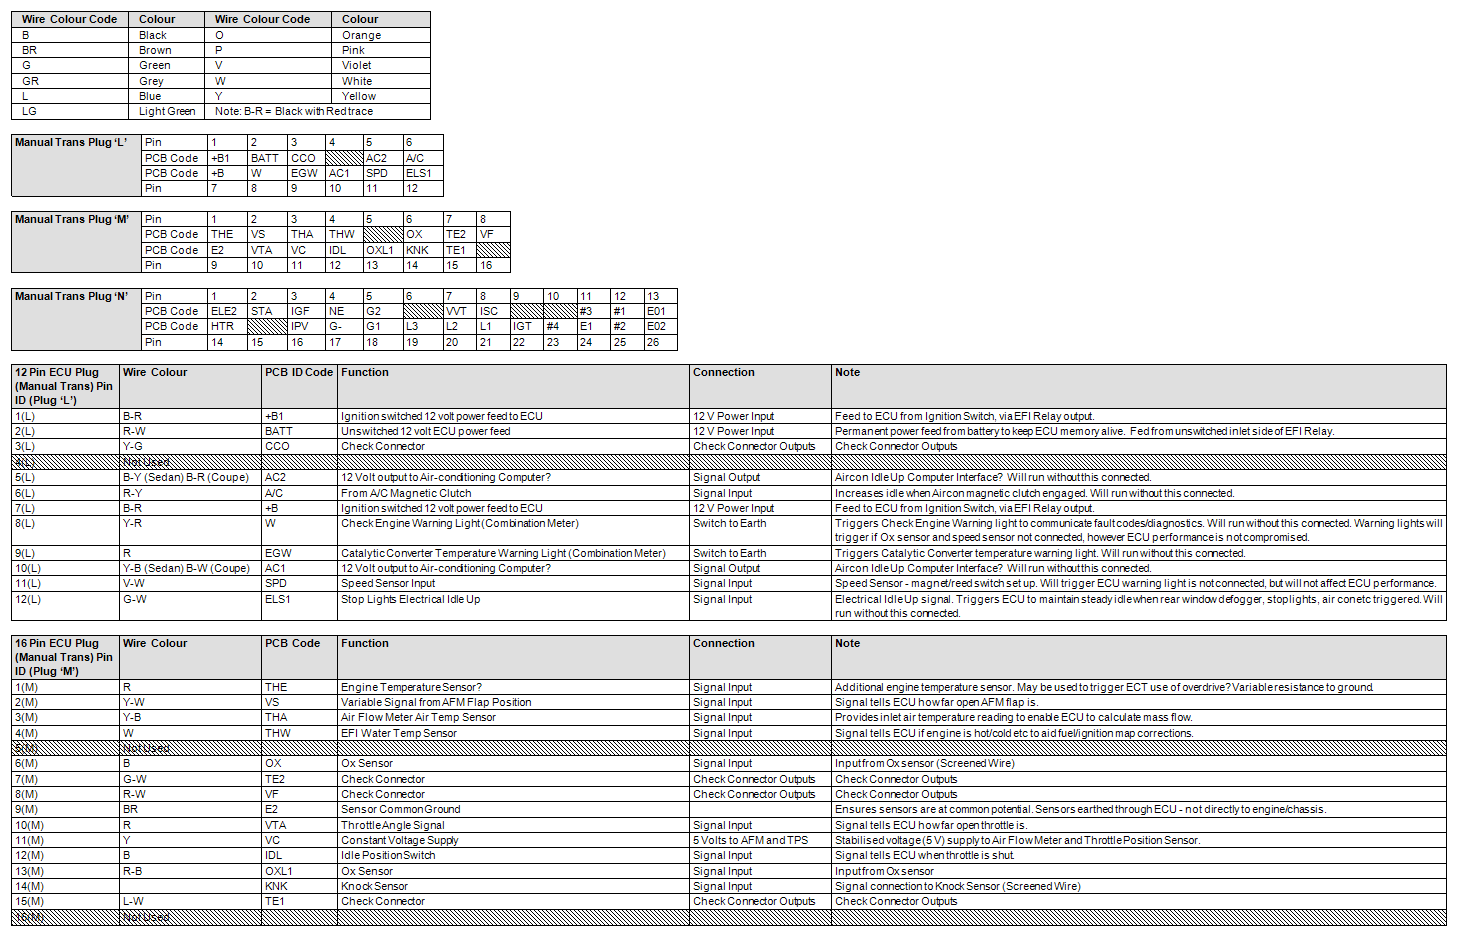
silvertop ecu pin-out(manual and auto)
http://4age20v.blogsome.com/20...inals/
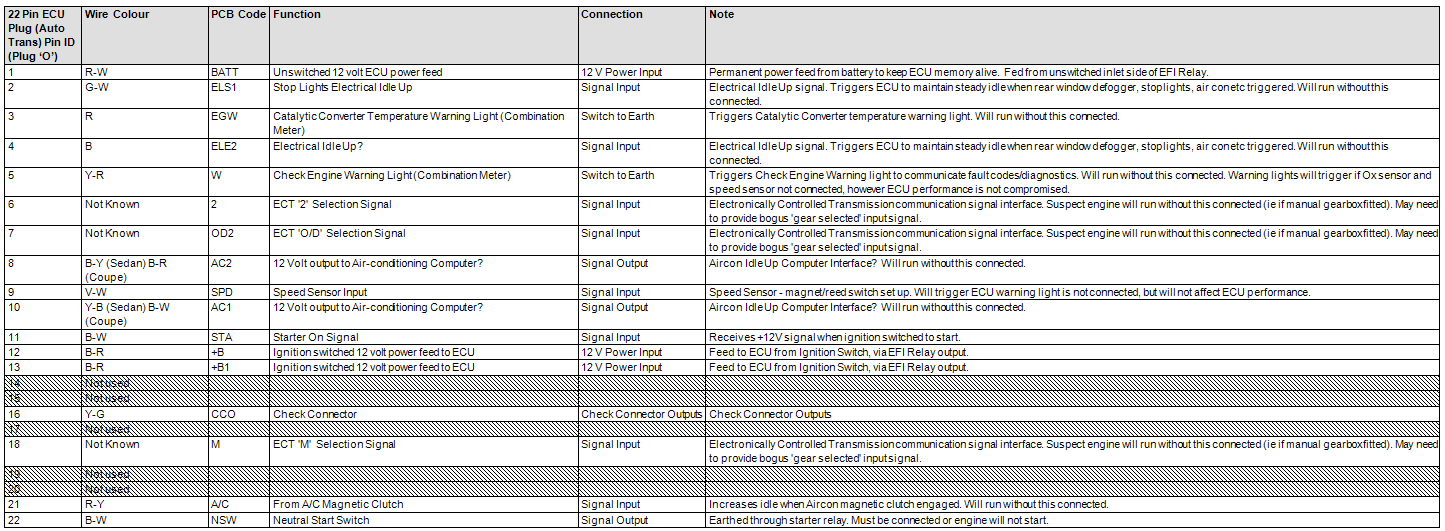
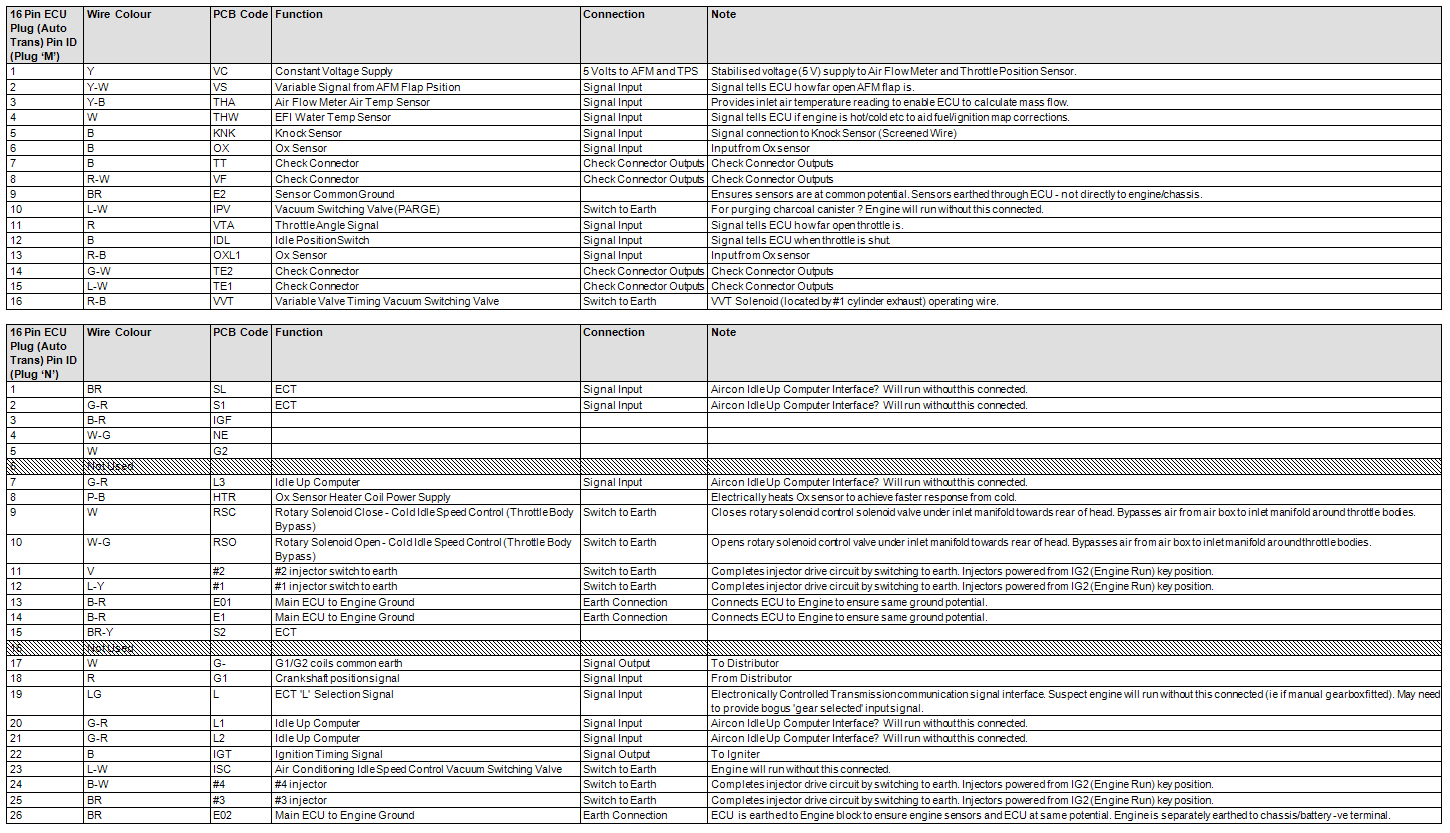
BT pin-out
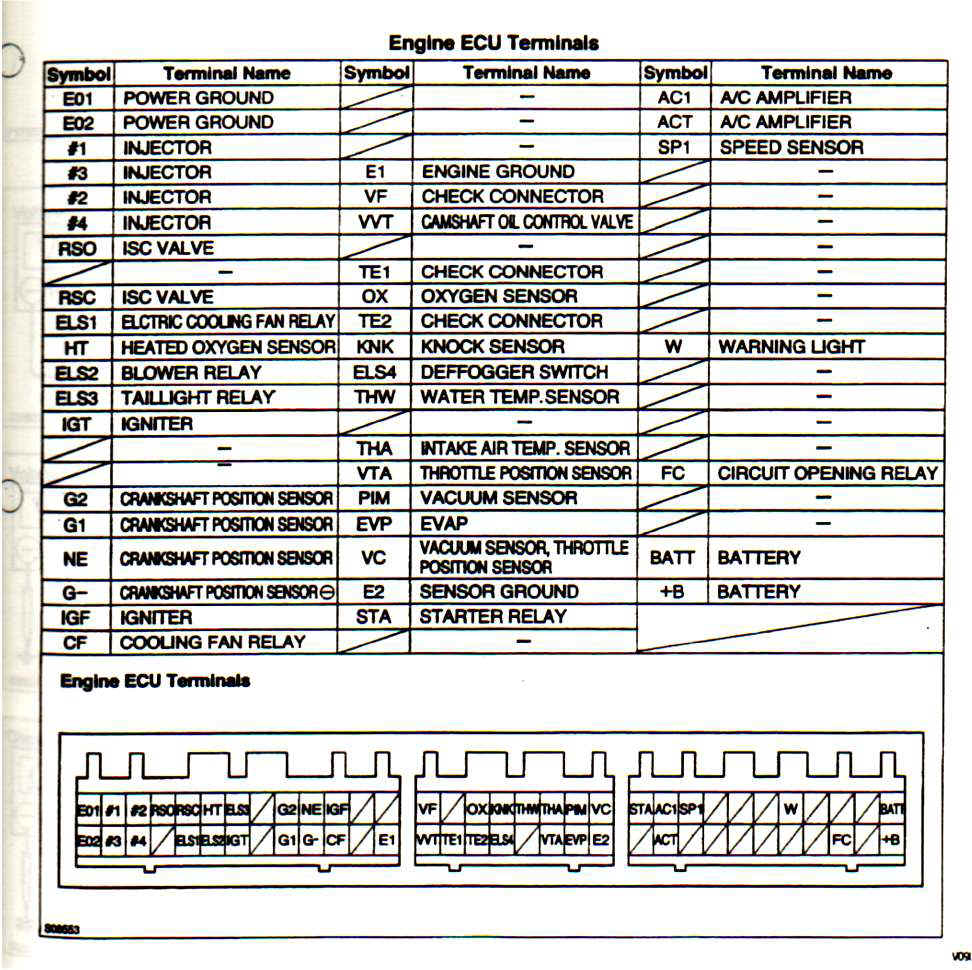
a full list of what each wire does. for an ST, but only difference from a BT is the AFM/MAP. really helpful...
http://www.docstoc.com/docs/24...-1999
the site this was on, now charges for downloads, so heres some pics of the pages. PM me if you want me to email you a .doc copy.
read the REFERENCE section of club4ag. tons of info and pics to save and print out.
http://club4ag.com/technical_main.htm
-----------------------------------------------------------------------------------------------------------------------
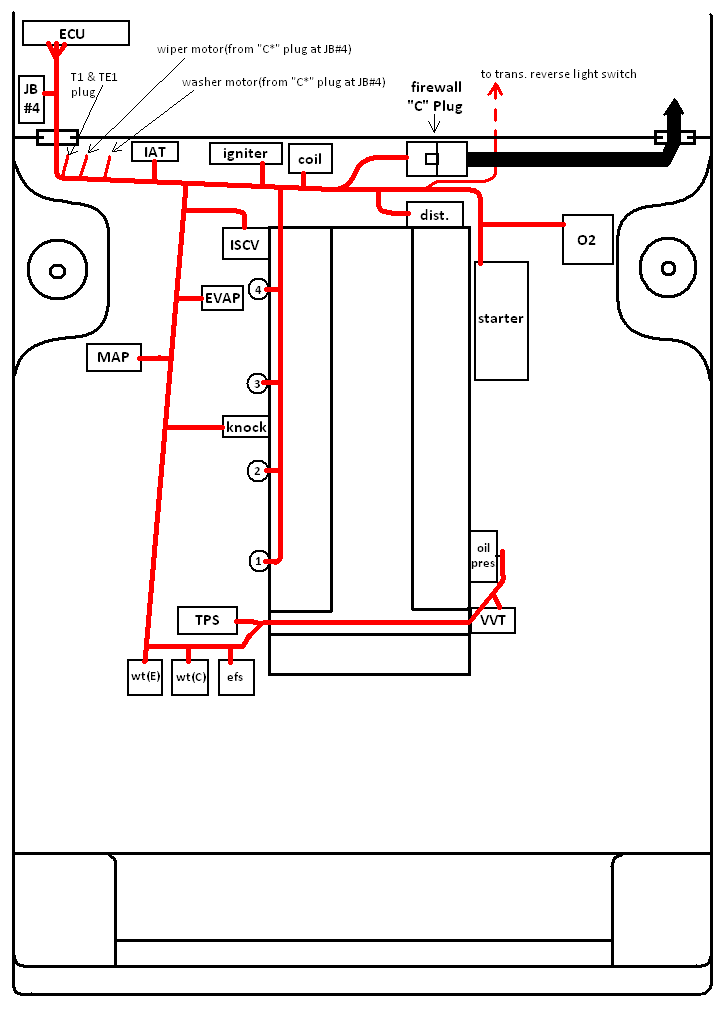
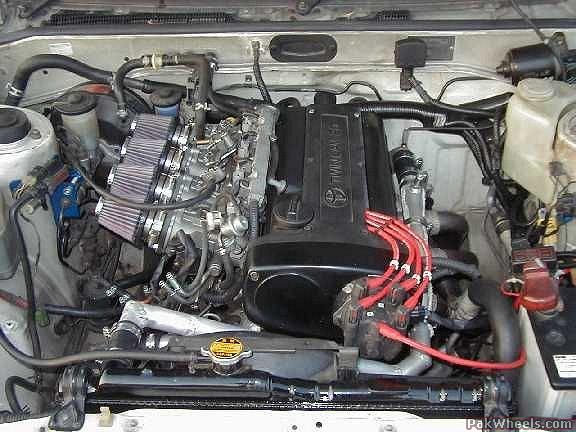
heres an overview of how i routed the wiring harness when it was all done.
to do your own wiring, you need a few pigtails from your stock harness.
1. the "C" plug-the large black plug on the firewall
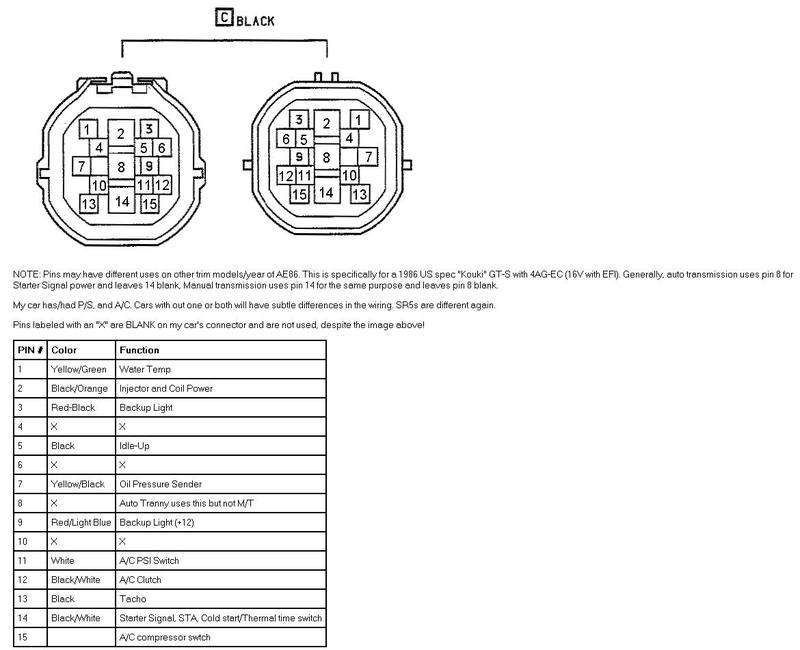
*photo courtesy of
Grant @ club4ag.
http://www.vems.hu/wiki/index....iring
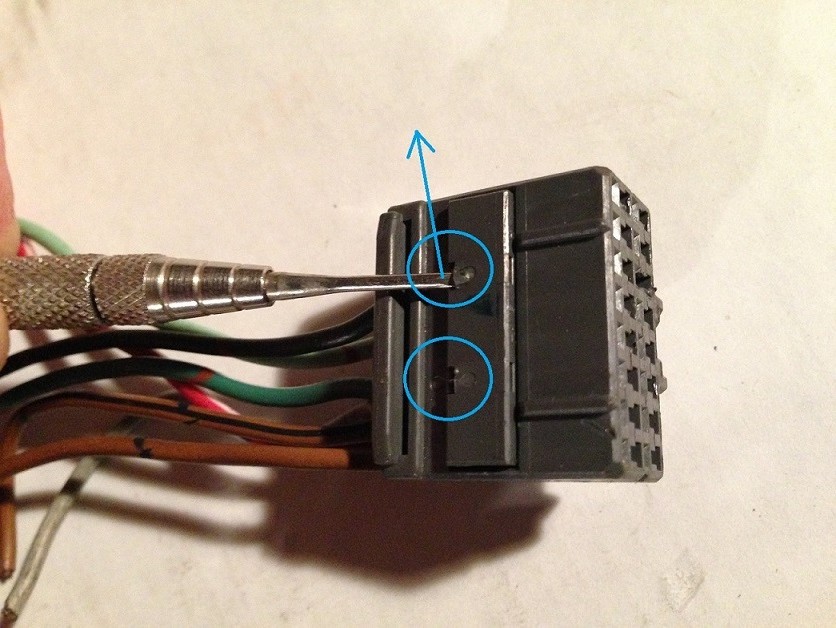
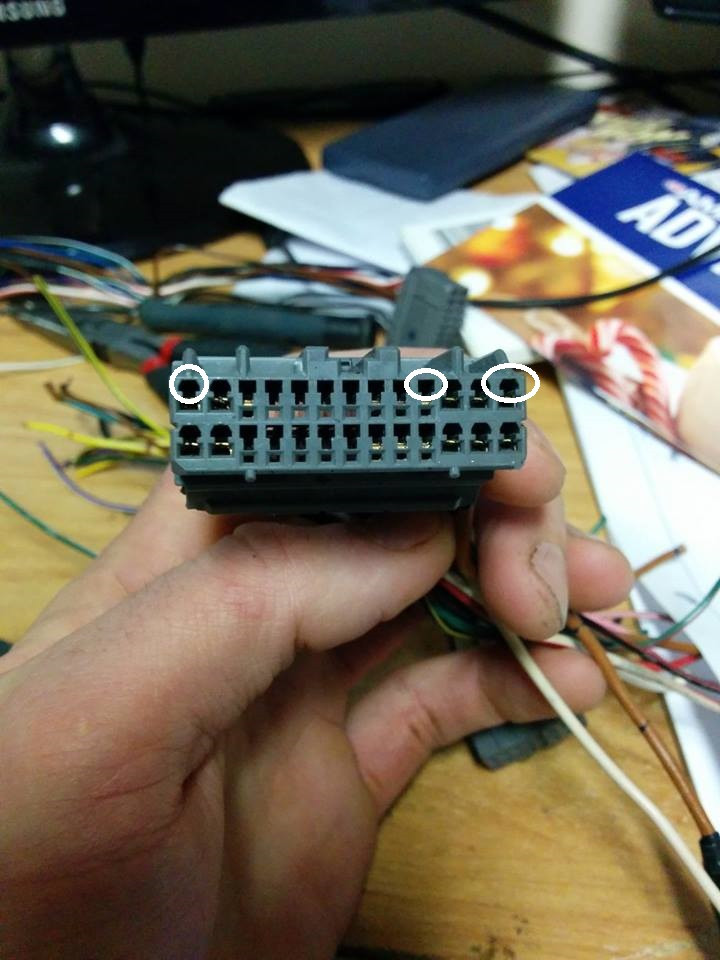
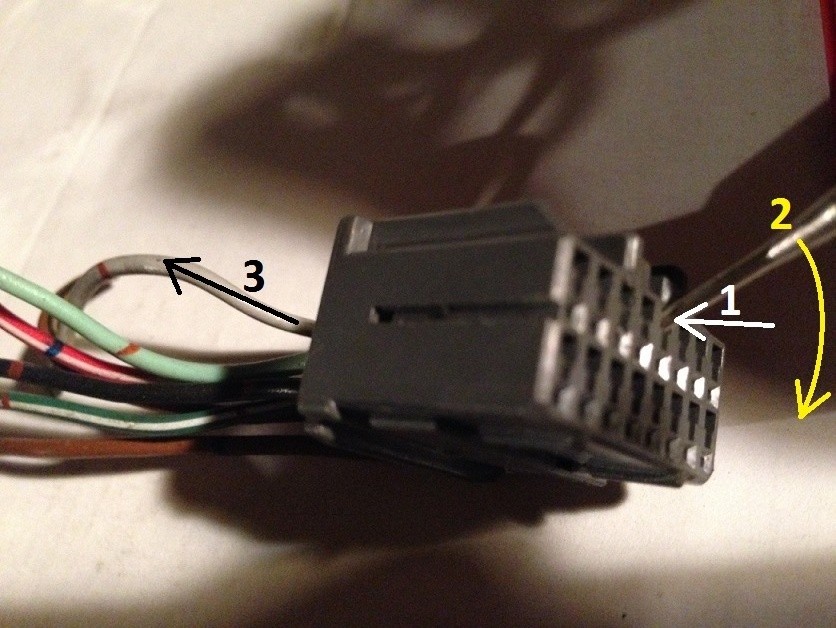
from the underdash harness, you need this plug which goes to the ECU, well call it the "T" Plug. more so, you need to cut the plug off and re-run some wires to the 20v ECU. the B+, SP1, and WARN wires.
- the B+(black with red dots) is from the EFI main relay and provides power to the ECU and some sensors
- the SP1 is the speed sensor(blue/white)
- the BATT wire to the 20v ECU plug(provides constant power to ECU even when car is off, for memory)
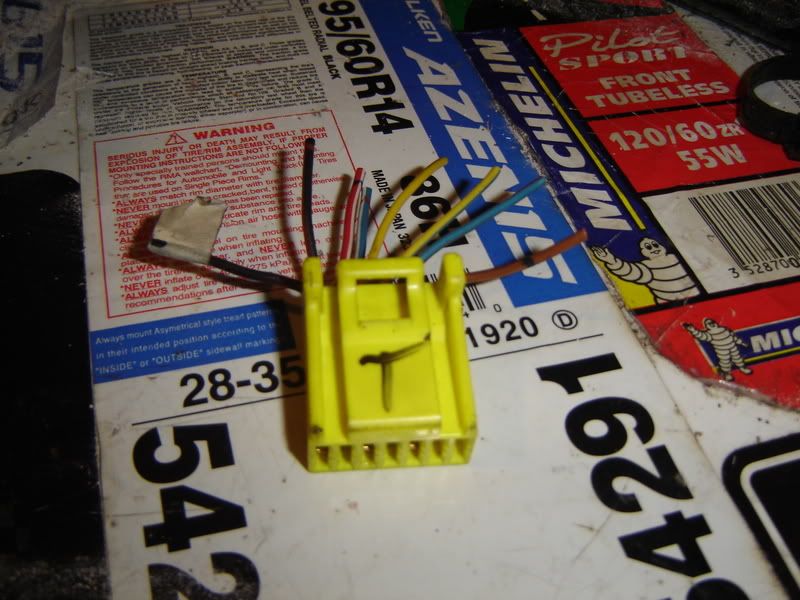
*photo courtesy of
nixeighty6 @clug4ag.com
heres the locations, on the ECU, just imagine the plug in there and see which wires you need.

*photo courtesy of
club4ag.com Reference Section & Woody
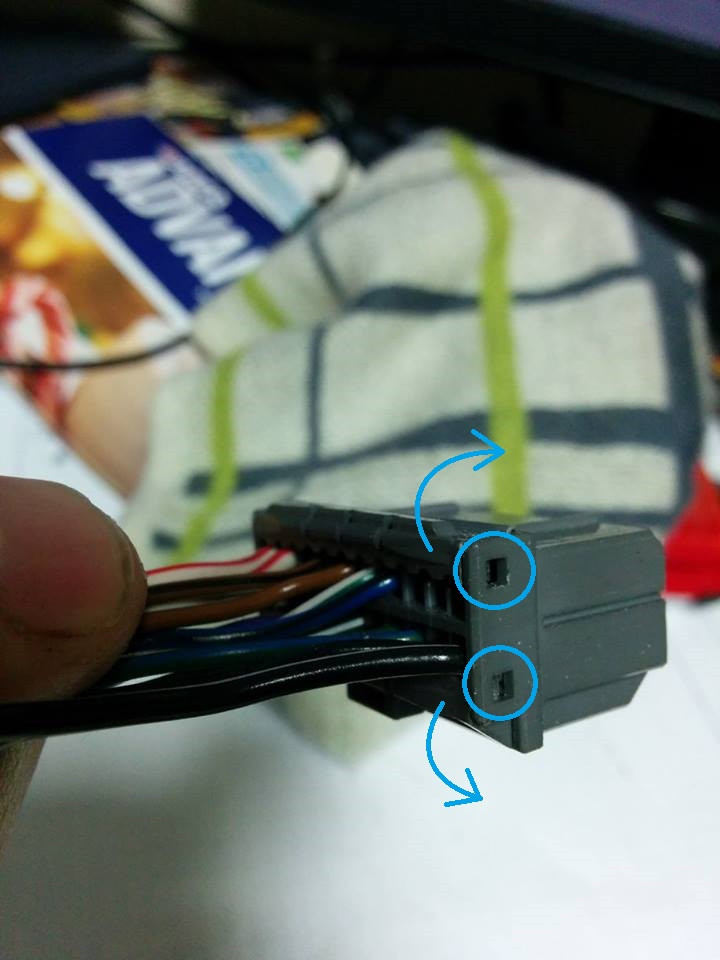
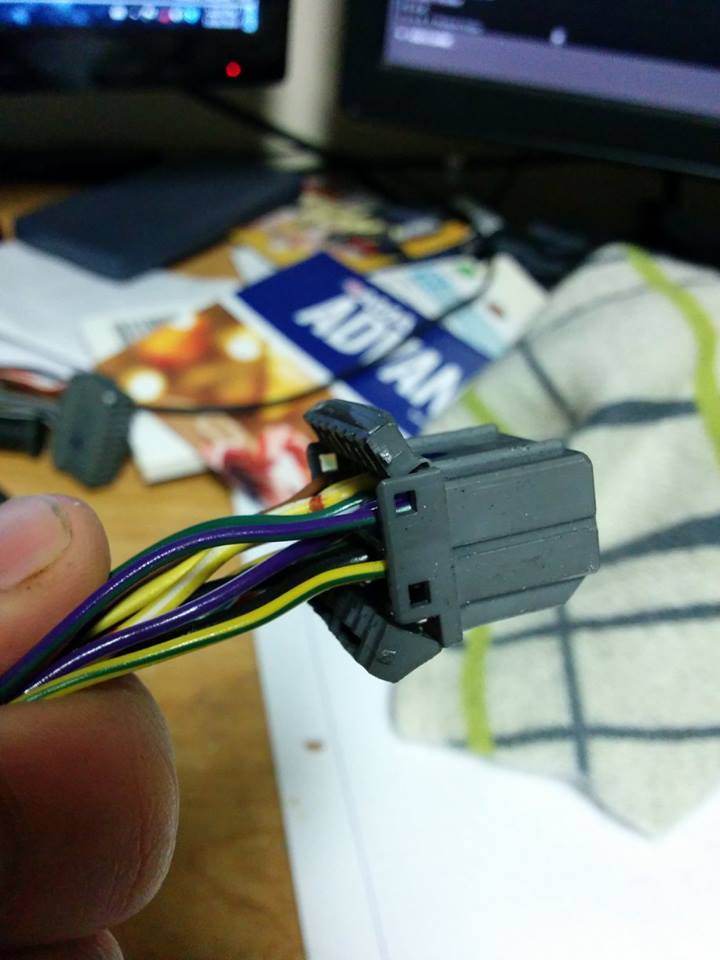
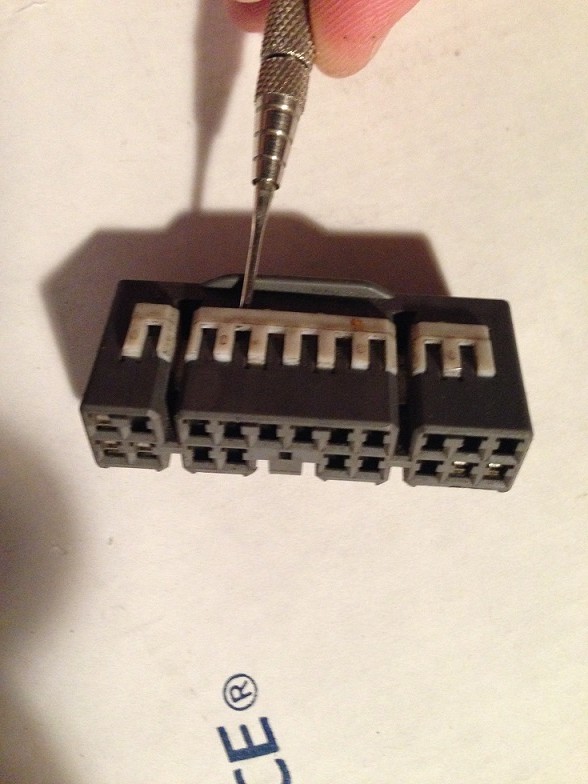
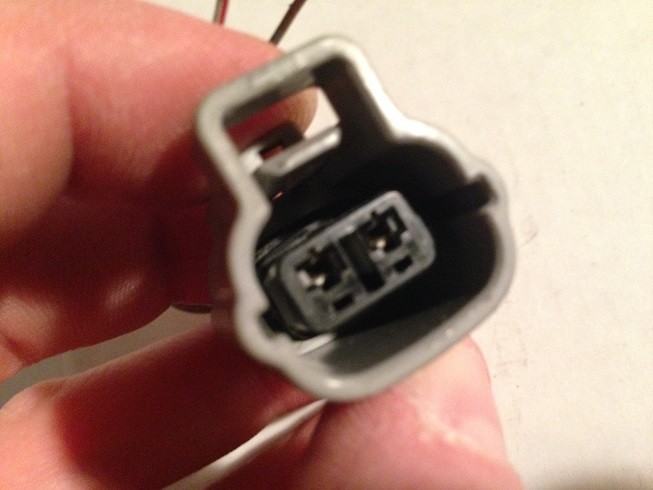
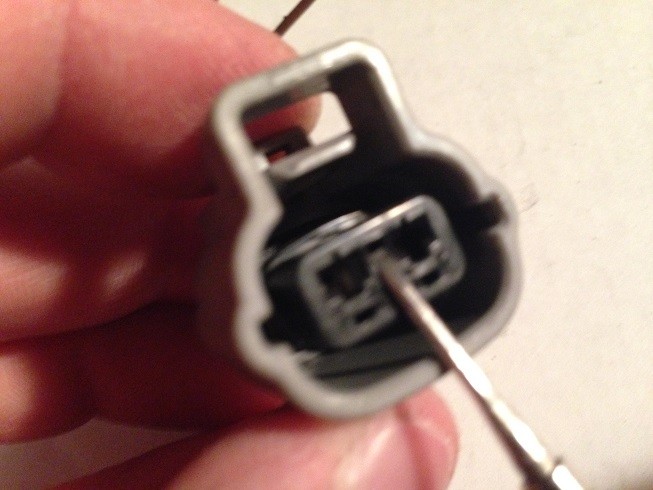
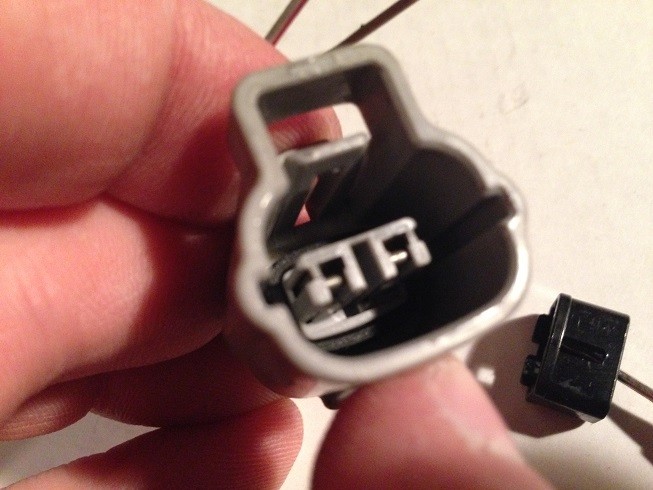
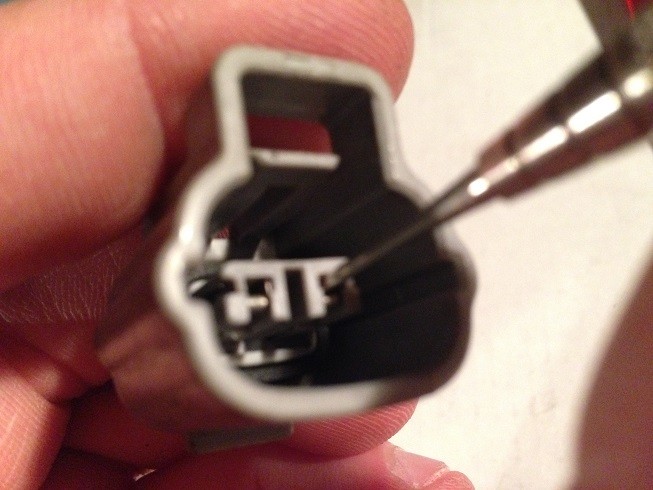
and the "C
*" plug, from the gts engine harness that plugs into Junction Box #4(JB#4) behind the passenger side kick panel. its the plug that im holding, you can see the difference between the other 2 for the ECU. what you want to do for this one is seperate the GTS harness and keep in tact the Wiper Motor and Washer Bottle Motor wires and pigtails and incorporate them into your 20v harness. you can cut the others, but dont cut the wiper/washer wires that are going directly to those 2 items, otherwise you get to solder those too, and why bother if its already complete. you also need to connect PIN#11(warning light)to the 20v ECU plug. the WARN or W(green/yellow) is the check engine light in the cluster. if you dont source a GTS cluster with this in it, wire up an LED or something.


-----------------------------------------------------------------------------------------------------------------------
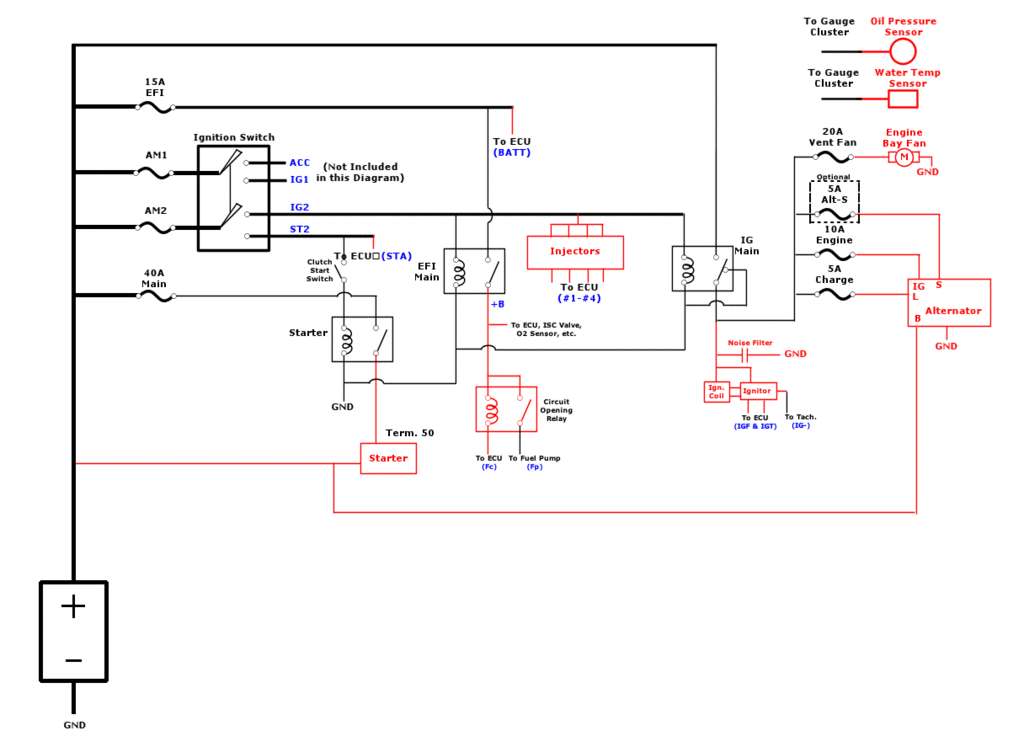
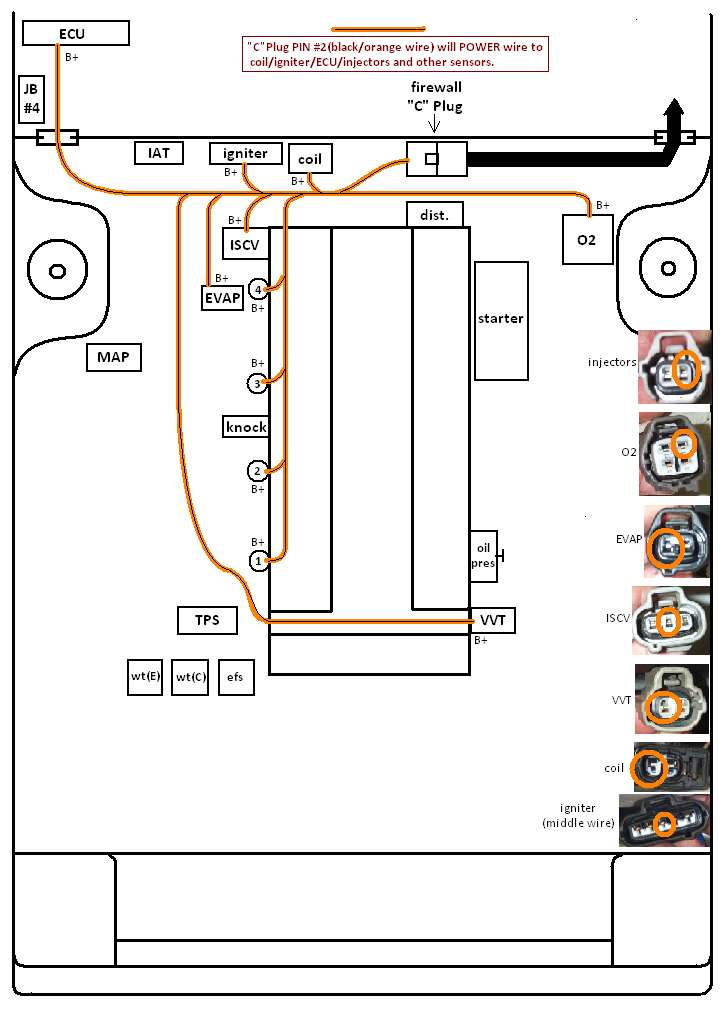
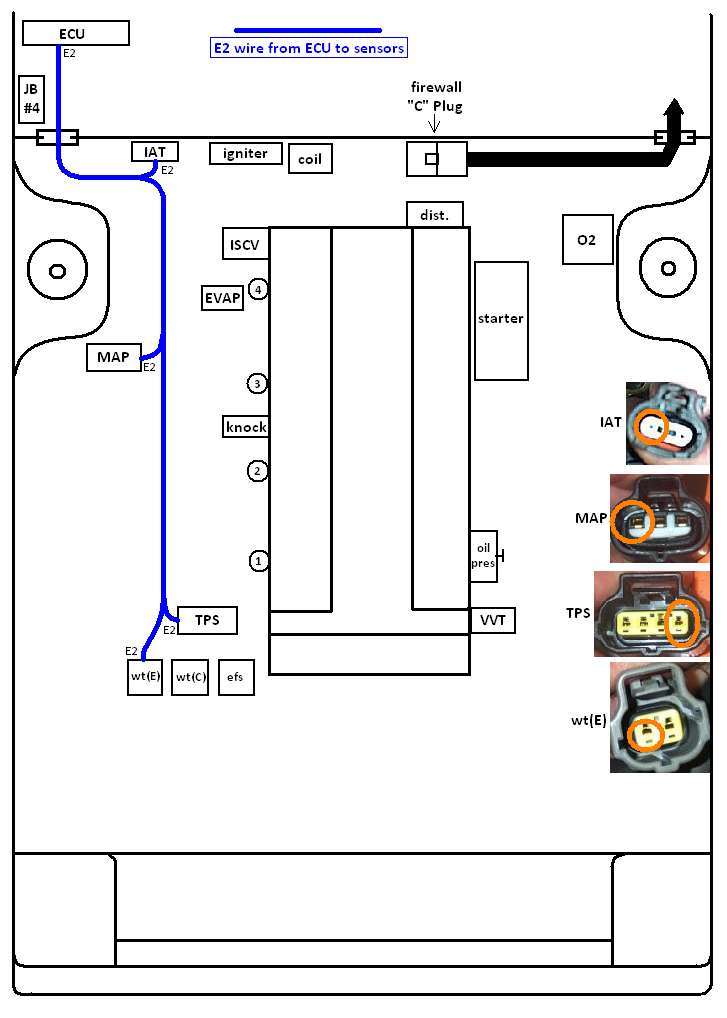
so heres a few diagrams i drew to help you through this...KEEP IN MIND THAT THE COLOR I CHOSE FOR EACH WIRE ISN'T NECESSARILY THE COLOR FROM A 20V HARNESS, its only so you can distinguish between each. and if your building your own harness, then who cares...on with the good stuff aka archaic drawings i provided. you can tell me you love me at any time...
the POWER wire, for everything listed, comes from the "C" Plug PIN#2, with pics of the pigtails and the wires in question circled...
the E2 wire(sensor grounds-through the ECU) with pics of the pigtails and the wire in question circled...
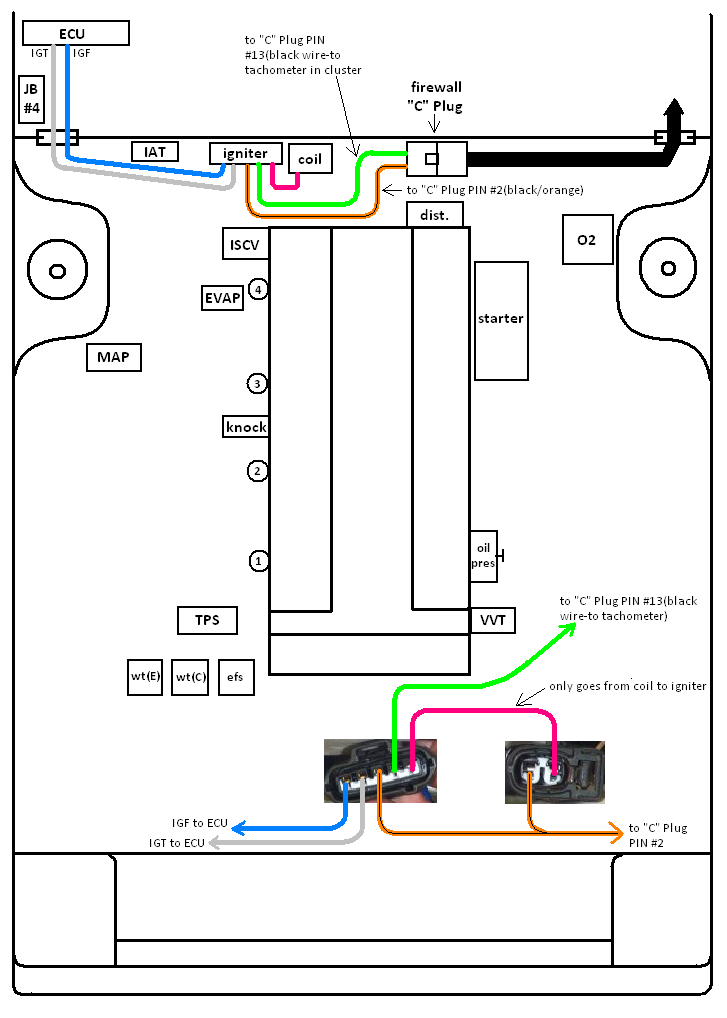
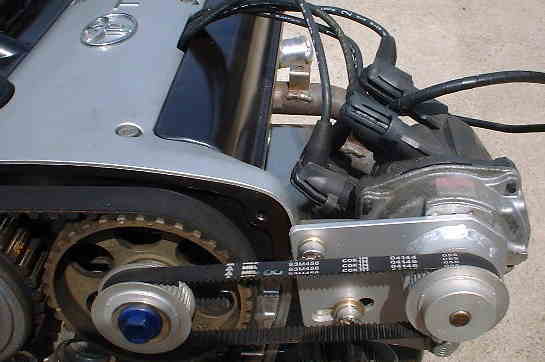
wiring the coil and igniter. on the bottom of the pic is the pigtails, and what each wire is...
then the injectors, on the 20v ecu they are labeled "#1, #2, #3, and #4". connect each of those to the corresponding injector. the #1 injector is closest to the cam gears, the #4 being closest to the dist. side of the motor. you should have already wired the Power(B+) wires from the "C" plug on the firewall, so this is the last step with these.

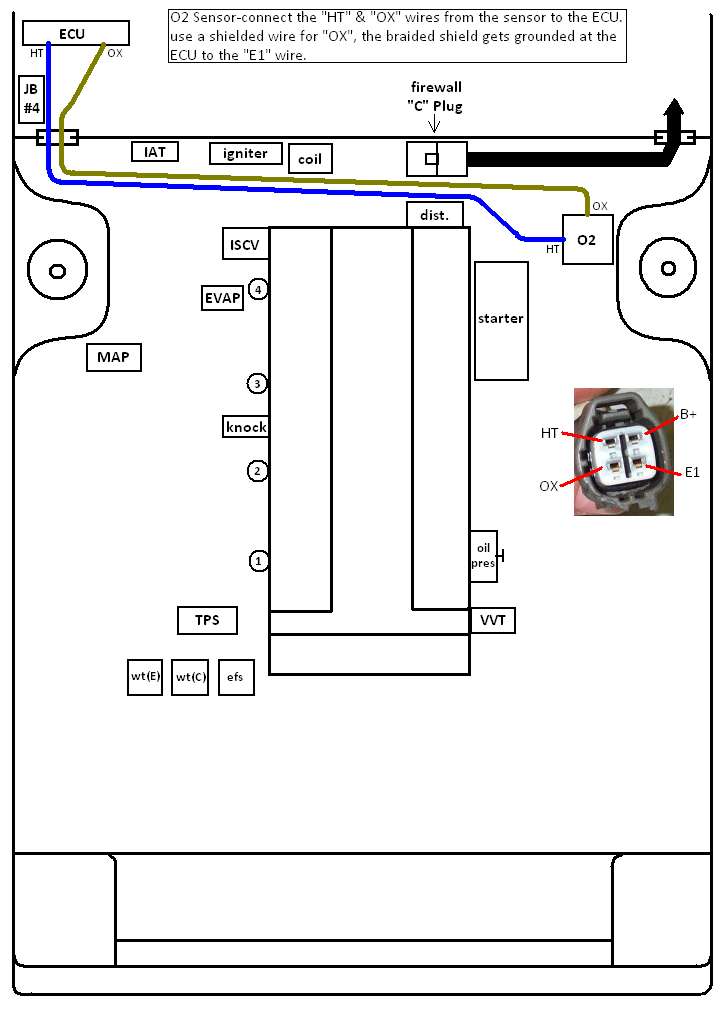
then the O2 sensor, the B+wire should already be done, so only the E1, HT, and OX wires left. you should use a shielded wire for the OX, this is like a braided metal netting that goes around the wire and keeps there from being any "interference" in the signal to the ECU. only thing is, you need to connect the shield to the E2 wire down by the ECU. if you bought a sacrificial harness, find out which wire is shielded and use that one. i will cover the "E1" wire later under "ecu grounds".
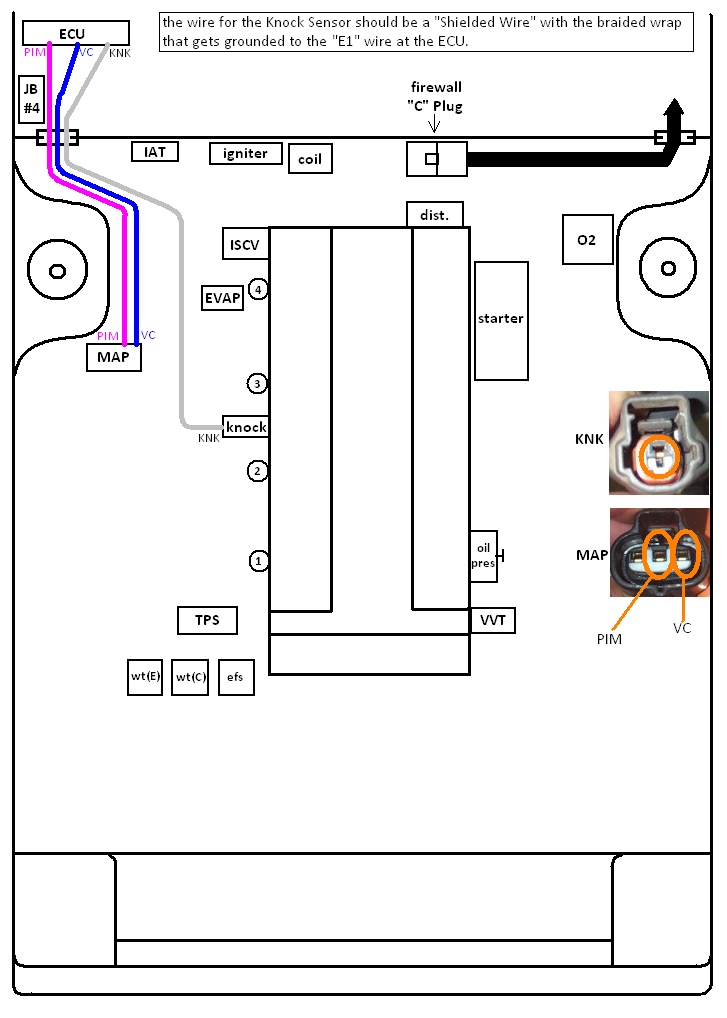
next work on the Knock Sensor and the MAP sensor to finish them up.
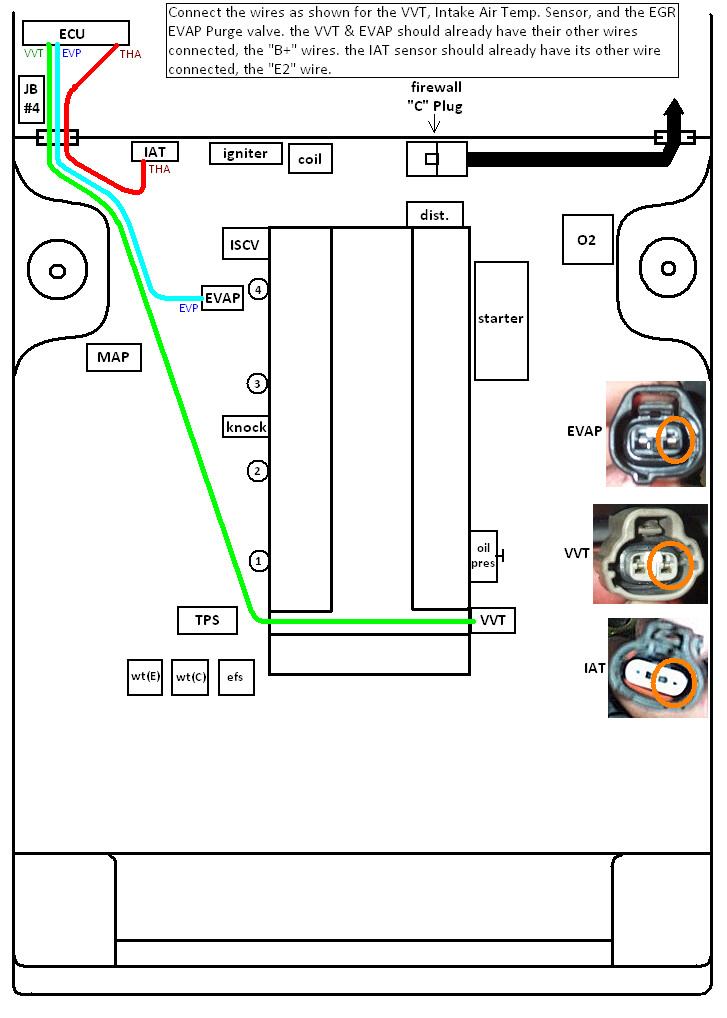
then finish up the the VVT solenoid, EVAP purge valve, and the Intake Air Temp. Sensor.
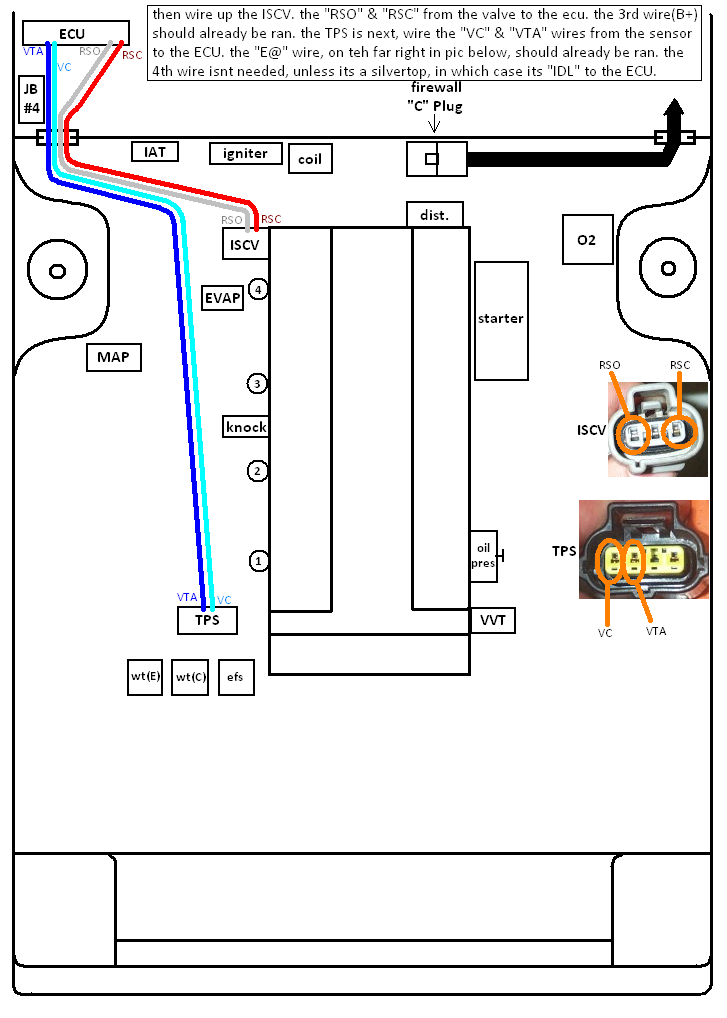
then connect the ISCV and the TPS. the TPS has 4 pin-outs, but the Blacktop only utilizes 3, while the Silvertop uses all 4.
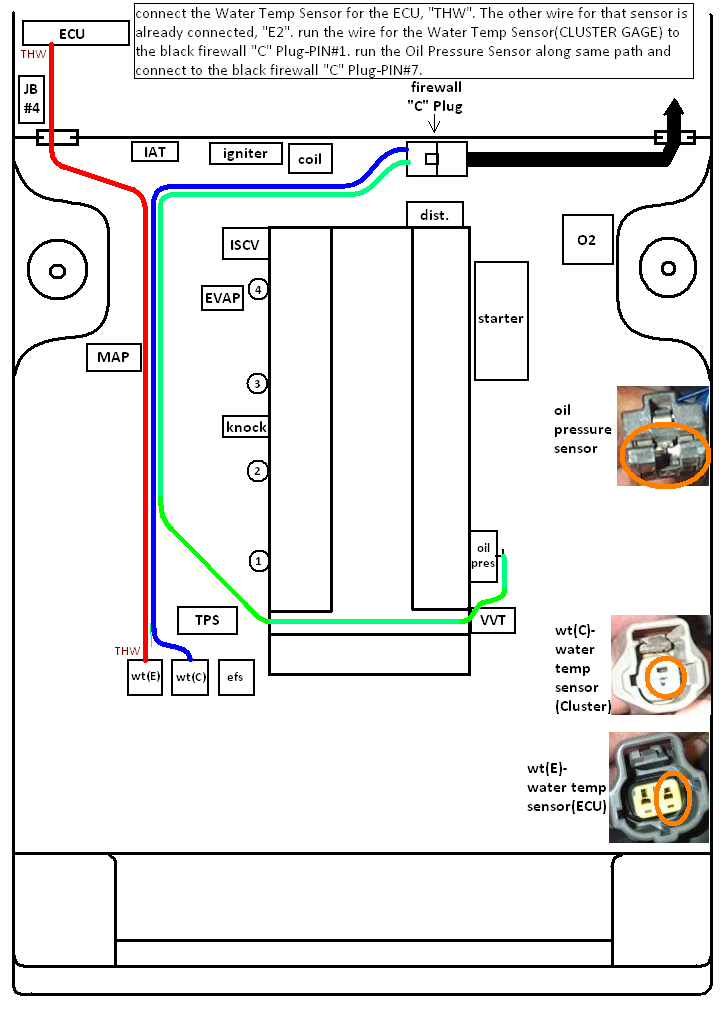
next is the ECU Water Temp Sensor"wt(E)", the Gage Cluster Water Temp Sensor"wt(C)", and the Oil Pressure Sensor wire. use the same wire from the 16v GTS harness if you want, just un-wrap the harness and pull it out so you dont have to solder it on the black firewall "C" Plug-PIN# 7. or just snip both ends and run a new wire.
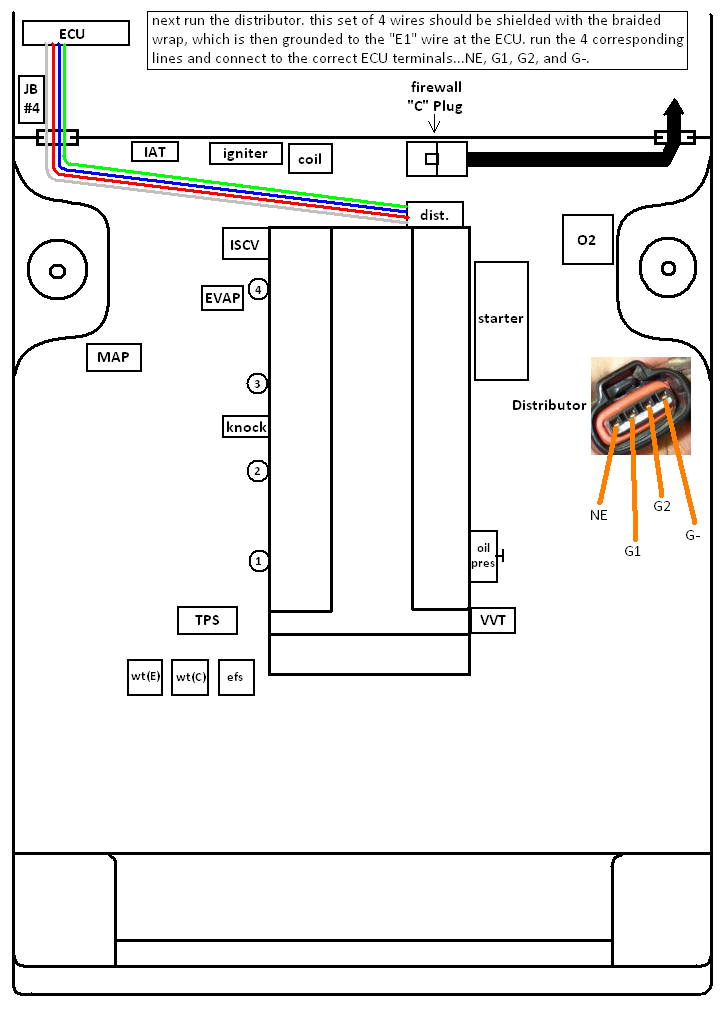
then there is the distributor. the 4 wires need to be shielded together with the braided wrap, then connect the shield to the "E1" wire at the ECU. i went to the junkyard and pulled apart a 1995 camry harness for this wire bundle, shielded and ready to go. it was about 8 inches too long so i shortened it. spent $10, and about 30 minutes of my times, and it came with the correct pigtail iirc.
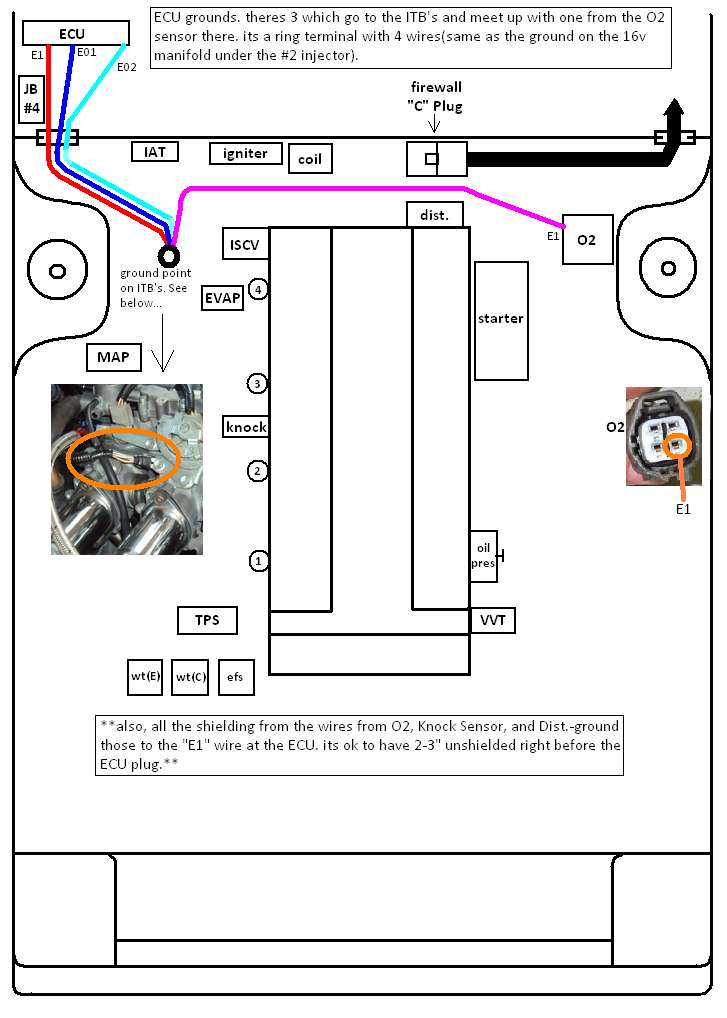
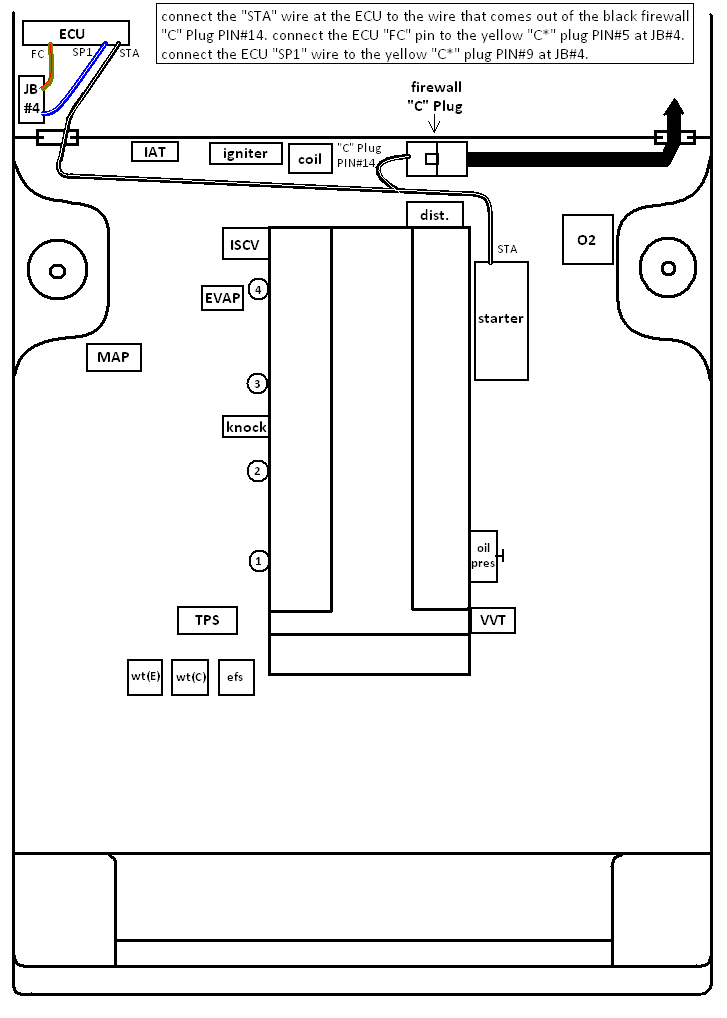
heres the grounds you need to hook up...
the starter power wire needs to be tapped into and ran to the ECU "STA" terminal, the "FC" terminal needs to be connected to the green/red wire of the COR, which can be accessed from the yellow "C*" Plug(pin#5) at the JB#4. and the "SP1" terminal at the same "C*" Plug too.
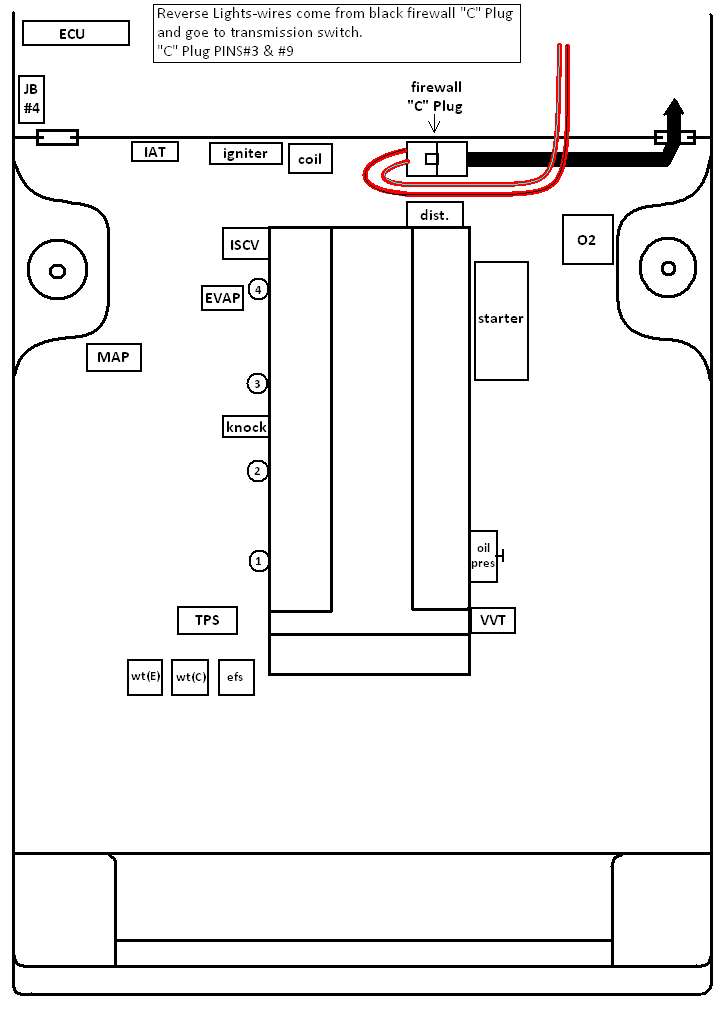
and the reverse light wires from the black firewall "C" Plug need to remain in tact...
------------------------------------------------------------------------------------------------------------------
*just about all pigtail pics taken from the
http://www.padandwheels.com site for reference, love that site...
------------------------------------------------------------------------------------------------------------------
more to be added as needed...
chances are i mixed a thing up or 2, if you see something wrong, let me know and ill fix it. likewise if i left anything out.
feel free to ask any questions, ill do my best to answer.
ENJOY!
morgan


 <
<


